Blog

  • Welcome to the Section Comics

    This is a place to experiment with the comics form in a variety of ways, which is a fun way to say that we make comics and are pretentious. But like fun pretentious, you know.

    We will be putting out our newsletter as soon as we’re up and running, and working on a variety of comics projects.

  • Introduction to the 48 Hour Graphic Novel

    Hi, I’m Dave, the co-creator, and idea man behind Graphic Novel Weekend or the 48 hour graphic novel. Admittedly, other people may have come up with this before, but I haven’t found any record of it – if you know of anyone, please let me know. 

    In this website, I’m going to bring together as much information as I can related to the concept, the goal, attempts that have been made both successful and otherwise. 

    If you want to contact me directly, I’m available at 48hourgraphicnovel at gmail dot com.

    What is Graphic Novel Weekend?

    Simply put, Graphic Novel Weekend, or a 48 hour graphic novel, is a single story graphic novel created by a combination of writers and artists over the course of a 48 hour period. 

    This is a serious challenge, because multiple voices and styles have to come together in a limited time and still manage to create a single coherent story. Communication has to be managed, corners have to be cut, and coffee has to be made. 

    How is this different from 24 hour comic day?

    The idea for the 48 hour graphic novel came from 24 hour comic day, and trying to find a way to make it a more collaborative process. The main differences are resources, time, and sleep. In 24 hour comic day, 1 person has to write and draw 24 pages in 24 hours. 

    With 48 hour graphic novel, groups are put together with one dedicated writer and several artists – and over the course of the weekend people may move from one group to another. 

    In addition, there is additional time – we have 2 or 3 separate days to work on the project (it depends on how the event is planned), and time to sleep is planned in. Sleep helps keep the mind sharp, and coherent, but also gives the ability to sleep on ideas and come up with new ways of doing things. 

    In a 48 hour graphic novel, some creators will create many pages, and some will work slower but with more focus – with this we balance the end project, but still finish it in one time, in one place, over a 48 hour period. 

    Why Create a 48 hour graphic novel?

    There are three reasons to create a 48 hour graphic novel. 

    First, the least important of these reasons is to have a finished graphic novel. If you’re joining into this project, you should really like comics, and that being the case, having more comics in the world is a great thing. And having a well made final product is great. However, the final product is the least important goal of this project – and it’s important not to lose sight of that fact.

    Second, of higher importance is what that graphic novel represents – this is a calling card for the creators involved. Credit is essential – and it must be 100% clear what was done by who. The creators will have something published that they can use to show off their capabilities. Sometimes it’s hard to create an entire project by yourself, but in a group, you can, and in the end to show this off it must be possible to see who did what in the book. 

    Third, and most important, is learning, networking, and connecting with others. The art world, and the world of an independent comic creator anywhere (or a European comic creator, in general) can be one of solitary creation. This is a situation where newer creators can learn from seasoned pros, and vice versa. Everyone has something to bring to the table, and something to learn as well as to teach. Really, the event should feel like a collaborative party in some regards. A time to learn and experience. 

    My own history

    Truthfully, I came up with this idea because of two separate events. First, I did a 24 hour comic day, by myself, shortly after moving to a new country. It was depressing and lonely. I craved a sense of community, but I thought about the process itself and realized that while I could go do a 24 hour comic day with a bunch of other people, I lived in a country where (at the time) I didn’t speak the language. I would have been alone in a crowd, and I wanted to be with people.

    Second, I realized that I’d had a half finished graphic novel sitting in my computer for years. Finding the time and energy to work on that was just not happening. I wanted to find a way to force the creation process. Not necessarily with that project, but with a project. And setting a time limit seemed like one way to do that. But an aggressive time limit had some requirements and we’ll discuss those and lessons learned in this website. 

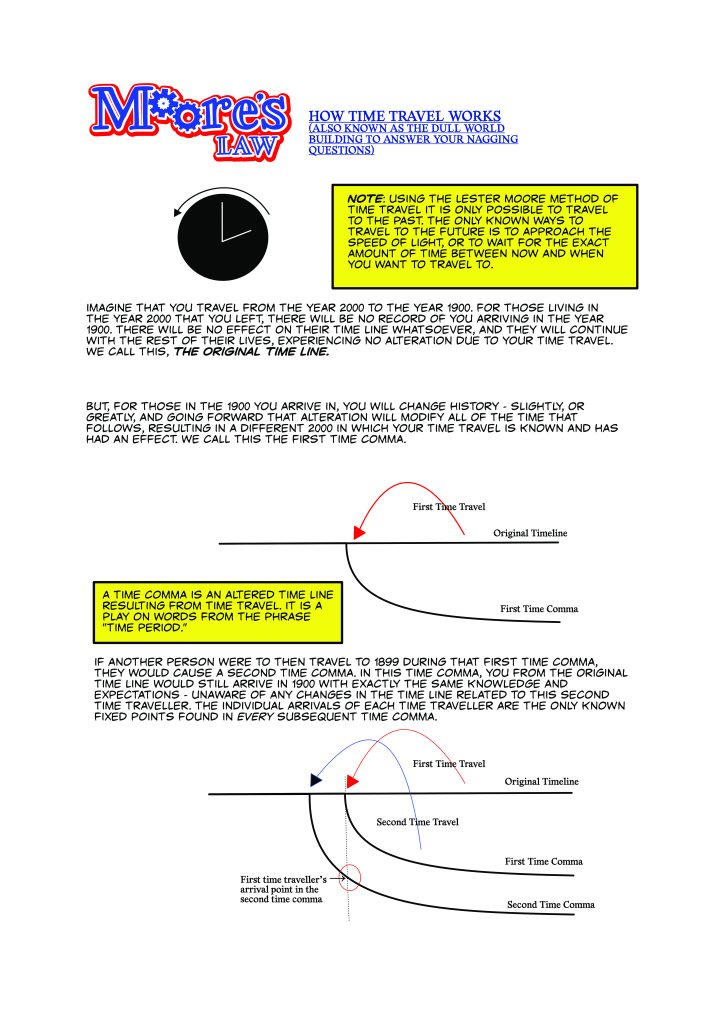
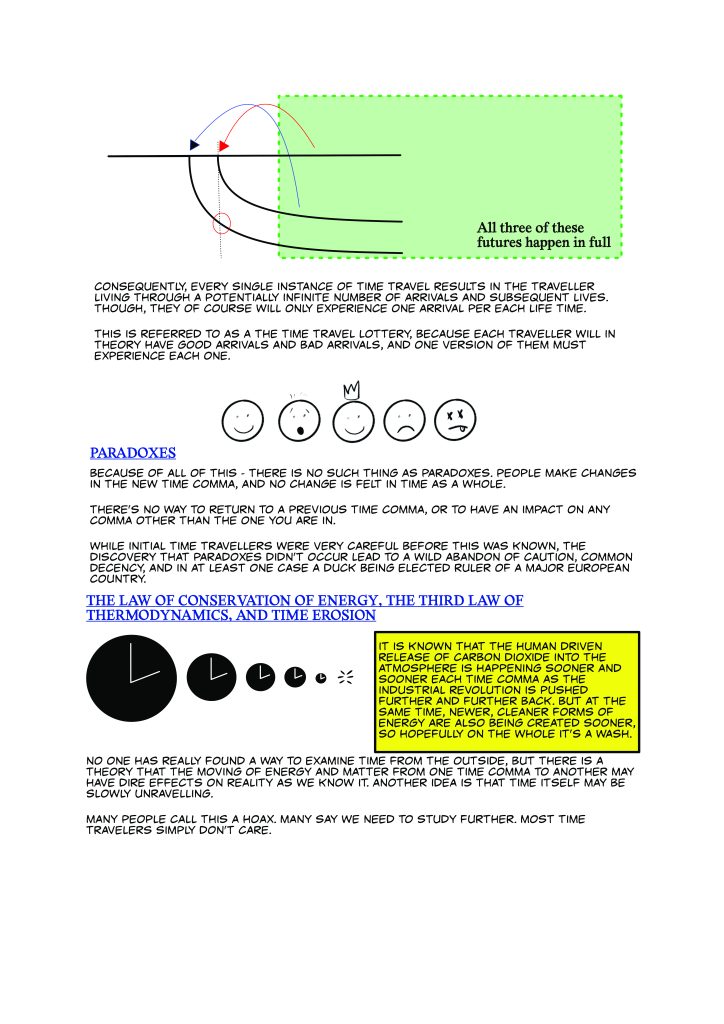
  • Moore’s Law Time Travel Rules

    From Moore’s Law issue 1 – here are the rules of time travel in this fictional universe:

  • Practical tips for artists for the best printed result

    NOTE from site: This post was written by David den Ouden, who’s worked on all 3 of the Doe Het Niet Zelf Dutch Graphic Novel weekends. It has not be further edited by the site owner.

    If you want to publish a graphic novel made in 48 hours, you need 2 things:

    •  Speed (so you can create as many pages as possible)
    •  High quality art work (you can publish)

    ‘Just’ creating two page spreads is not enough. The art work needs to be scanned (if on paper), processed and made ready for print.

    Based on experiences with GNW Utrecht 2019, GNW Haarlem 2020, and GNW Amsterdam 2021, we had some lessons learned. So we have some practical tips.

    Sketching and setting up the page

    If you work on paper:

    • You don’t want lead pencil sketches on the final art work;
      • Erasing takes a lot of time, so we can’t do that (because we need speed).
      • Pencil is graphite and is highly reflective. Even light pencil lines show up quite dark in scans.
      • Exception: if it is your style of art to always leave your pencil sketches visible in the final art work, go for it.
    •  So DO NOT sketch with lead pencil on the same sheet as your final art work.

    Some possible solutions:

    • If you ink your sketches directly (on the same piece of paper):
      • Use a light coloured pencil or mechanical pencil (for the Dutchies: vulpotlood).
      • RECOMMENDED: use a (non-repro) blue color! (this can be filtered out very easily, big time saver)
      • E.g. I work with pink colour pencil and a blue mechanical pencil.
    •  Do not ink your sketches; use a light box or other tool to trace and ink your work on a new sheet of paper.

    Working in gray

    With the previously mentioned GNW’s we did not only work in black and white (= time saver, aka speed), but also in gray. Which can work very well. But you have to make sure you can print it in the same quality as the art work itself.

    If you work in gray, for the final printed graphic novel, you want your blacks to be truly black and the gray to have all the nuances and levels as the original art work. You do not want your black lines to turn out dark gray or black-ish. It kills the page.

    How to do the scanning properly, is described in the next section.

    These practical tips we’ve learned the hard way; it will give you better quality and in the end save a lot of time.

    • If you work in gray you have 2 options:
      • 1.   Add the gray to the black and white on the same sheet of paper.
      • 2.   Add the gray on a fresh sheet of paper (use a light box for gray).

    So:

    1. If you draw on the same sheet of paper:

    •  First draw the black and white (line) art.
    •  Scan the black and white sheet.
    •  Add the gray to your sheet.
    •  Scan the sheet and this is really, really important: scan the sheet with the same scanner and same orientation (upper right corner of your page) as the black and white sheet.

    2. If you draw your black and white (line) art on one sheet and the gray on another (using a light box):

    •  Scan both pages with the same scanner and same orientation (upper right corner of your page).
    • Add indicators (e.g. +) in the corners outside the drawing area so the 2 scans can be lined up perfectly.

    Those 2 emphasised sentences are really important. I’ve learned the hard way with GNW Haarlem 2020. The art work was scanned in black and white at the event. Back home, doing post production, I scanned the gray page on another scanner. It was impossible to line up the 2 scans; rotating and correcting for distortions did not work. I’ve spent hours cutting up the gray scans of for pages in small pieces, panel by panel to rotate and deform them so they lined up.

    Most scanners are not perfect and they all distort pages slightly different. So to compensate for that, use the same scanner. And the same orientation, since the scan might have small distortions from top left to bottom right. Rather have the same distortions in the same places.

    Scanning the art work

    Even if the artist is not scanning the art work themselves, it is good to be aware of the process.

    • Scan at the highest possible resolution: 600 dpi (preferred), no less than 300 dpi.
      • This leaves most room for adjustments, polishing up pages and high quality printing.
      • The industry standard for American comics is 350 dpi.
    •  Save as TIFF and if that is not possible, JPEG.
    • Scan as a photo, not a document:
      • Even if you only have black and white line art.
    • If your art work is black and white or gray scale (no colour on the sheet):
      • Scan as gray scale (NOT black & white).
    • If your final art work has unwanted colour:
      •  Like sketches in colour on the same page.
      • Like with fancy comic art board paper with a blue print for panels.
      • Scan as colour.

     Digital art work

     If all is fine, you work on the same format as the paper artists.

     Preferably you work in 600 dpi. If that is not possible, at least work in 300 dpi.

     The industry standard for printing comics is 350 dpi. Which can be an issue if e.g. you have (an older) non-professional version of Procreate. With just using black and white you should be fine, if you use gray scale as well,  better check with the organisers of the GNW to see what will work.

    Post production of the art work

    We can’t do a whole course on Photoshop and post production here. But there are a few basic things we can mention.

    You want the black and white (line) art to be truly that: just black and white.

    In post processing we want to optimise the art work, so we have the best quality. If you scan as a document or black and white, the scanner takes all the decisions for you. And you want to make those decisions yourself in Photoshop (or another tool).

    To create high quality black and white images, there are different approaches that all work.

    I usually take the following steps for processing a scan in Photoshop.

    For scans with colours (from pencil or art board paper):

    •  Especially with removing colour, there are many solutions. Pick whatever works best for you.
    • Recommended for (non-repro blue):
      • Create an new Channel Mixer adjustment layer and set the Preset to ‘Black & White with blue filter (RGB)’
        • This method may still need some polishing up, but most blue will be gone swiftly

    Or otherwise:

    •  Copy the background scan layer to a new layer; from this layer you will remove all the colour.
    •  With the magic wand with high enough tolerance and no anti-alias you can select the colours and delete them.
    •  Make sure not to accidentally select any gray scale you want to keep.

    Next:

    • Proceed with the following steps; use this layer without colour instead of the background layer (original scan).

    For black and white (line) art scans:

    • Copy the background layer to a new scan layer.
    • Rotate and move the scan so it lines up with the final page template (panels in place, etc.).
      • Most scanners have some sort level of distortion, so you might have to use a lens correction filter instead or other tools as well to restore the shape of the scan.
    • Add Levels as an adjustments layer and optimise the levels;
      • The white of the paper will be white with some margin (output level < 255).
      • The output level of the black will start in the black ink range (so not just at the beginning level of the black spike).
    •  Add a Treshold as an adjustments layer and optimise what you want black and what not.
    •  Copy the scan layer and 2 adjustments layers and merge these layers.
    • Select all white in the merged black and white drawing and delete the white.
      • You now have a high res layer with a drawing where you can put a gray layer under, without any lighter gray edges.
    •  Add a white background layer.
    •  If needed, go back to the first step and optimise the levels and threshold.

    For gray scale scans:

    • Add levels as an adjustments layer and optimise the layers.
      • The white of the paper will be white with some margin (output level < 255). You don’t want the paper itself to be any gray scale.
      • The output level of the black will start at the beginning in the black ink range.
      • Tweak the middle gray output level.
    •  Add other types of adjustments layers and optimise the grays.
    •  Copy the scanned background and adjustments layers and merge these layers.
    • Select all white in the merged gray scale drawing and delete the white.
      • You now have a high res layer with a gray scale where you can use under the black and white art work.

    Next: Clean up the scan. Duplicate the layer with the art work (so you preserve processed scan). Erase all specks, errors and other things that should not be in final art work. Usually you do not want anything outside the panels.

    Combine the processed gray art work with the black and white (line) art work and make sure they align. This can require some rotation or even a lens correction filter to align them perfectly.

  • What is a Graphic Novel?

    The concept of a graphic novel goes back quite a while, but there first person to use the phrase in its current form, I believe, was Will Eisner in relation to his book “A Contract with God.”

    The rough idea is that it’s a long form comic book containing a single narrative. It might contain multiple stories from different points of view, but they all connect to tell one single cohesive narrative.

    It is not an anthology

    A 48 hour graphic novel is very different from an anthology, which is a collection of possibly unrelated stories, which all fit a single theme. Those are very easy to do in a short term project like the one we’re discussing in this website, because everyone has complete control and can work independently and never talk to anyone else and just make their thing.

    A single narrative with everyone working together, on the other hand, requires the communication and community that this type of project was meant to bring about.

    A little jam, A little exquisite corpse

    Though they are not directly what we’re doing here, the concepts of a comic jam or an exquisite corpse are also worth understanding, because there’s a bit of that to a 48 hour graphic novel. Those are story telling forms where one creator begins, and another takes what they have written, and creates the next section (in a comic jam, it’s usually page by page). It’s a more linear story telling process, where everyone just builds off of the person who came before.

    This isn’t really the idea of a 48 hour graphic novel, but it’s more in-spirit with the idea than an anthology is, because it has that component of trying to tell one story together. The difference is, of course that on a practical level in a 48 hour graphic novel, you don’t have time to wait for the each individual before you to finish their part before it’s your turn.

  • Feedback Welcome!

    I don’t believe there’s one right way to do anything — but I do generally believe that there are things we can do that will make it easier to achieve a 48 hour graphic novel for the majority of people. I’m just not certain I know them all. In fact, I’m fairly certain that I don’t. So, I’d like to hear from you.

    Everything in this webpage is based on what I’ve seen, what I’ve understood, theories I have, and what others have suggested. I want to hear any experience that you’ve had, or ideas and suggestions for solving the many difficulties associated with a project of this sort. So, if you start your own 48 hour graphic novel or participate in one, and notice something, let me know.

    I hope it’s pretty clear from the text that I will write about different points of view in the process. I might have my own point of view in there, as well, but in fairness it is my website. And I’ll make it clear when it’s my commentary so people can ignore that part.

    So feel free to email me at 48hourgraphicnovel at gmail dot com.

  • The Event Timeline

    Everyone who does a 48 hour graphic novel is probably going to do it differently, and more importantly, should do it differently and make it their own.

    But when you plan out the event, you need to make decisions. The only rules put in to this concept, obviously, is that it’s 48 hours and it’s a graphic novel. Beyond that, it’s open. And point of fact, I don’t even have any control over you doing a 46 hour graphic novel, or a 48 hour quilting bee, so really, even those two “rules” are just guidelines.

    The timeline we planned in the very first graphic novel weekend

    For the first GNW, we had an evening session on Friday, a full day on Saturday, and worked until 5pm on Sunday (48 hours after the beginning). The beginning evening was mostly planning and discussion, with some work being created. The second day was really the meat of the project. The third day was a mad dash to finish everything. We made sure there were regular meals brought in by caterers and snacks available all day.

    We found that over time there was less need for the writers to be present, as the art naturally takes the most time. But Initially, the plan was to have morning meetings with the writers on both Saturday and Sunday. The initial goal was to have act 1 finished the first day, act 2 the second day, and act 3 on the third day. The writers instead planned a structure on the first day and each took a chunk of the story. So that turned out not to be necessary, for us but you might want to do it the way we (i.e. the organizers) originally intended.

    We also determined that we wanted people to be able to sleep between the days, to have a more balanced experience than 24 hour comic day can give (after being awake for 24 hours, if you’re writing in sequence, act three is bound to have a few inconsistencies).

    But this was what we planned out for that event. There are definitely other options.

    Make it your own, but make it

    Helmuth von Moltke, a Prussian General who died in 1891, had some advice for those engaging in a 48 hour graphic novel. He said, “No battle plan survives first contact with the enemy.” All the same, it’s still better to have a battle plan. I recommend making a detailed planning of what you expect to happen, and what needs to happen in the project, based on the time you have. Figure out when you want people at the location, when food will be there, when you’ll start, when you’ll end, etc. Things may shift almost immediately, but the next steps still need to happen, and this will help you determine order changes.

  • Give credit where credit is due

    From a creative project perspective (be it a film, a book, a work of art, etc.) the most important thing is having proper credit. This is what makes it easier for creators to get additional work, to use any creative project’s final results as a CV, and for consumers to follow up and find that creator’s other works easily. It can show not only that they were involved, but what they did, and what they are capable of doing.

    When making any comic project, it’s important to note what creators did what on a page by page basis.

    The other reason we do this

    The American comic book industry had some real difficulty over the years giving the creators their due (from important creators like Carl Barks and Bill Finder to lesser known figures there are so many stories of creators who almost went uncredited completely and suffered because of it), so it’s become a very important part of any comic project from a different perspective. It’s part of comic creator ethos and now-a-days, not giving specific credit is considered pretty unethical except in cases where creators intentionally want to remain secret, and even then they usually use a pseudonym.

    European creators have used pseudonyms in comics for other reasons, of course – Hergé, Peyo, etc. It’s as important to respect that aspect of things as it is to give credit, of course.

    NOTE: Admittedly, the process of giving credit to mangaka assistants in manga is a bit murkier to me (as I do not read Manga in its native language), but as I understand it they are generally credited in some way, though it can be a lot less clear to readers. But there you have a real structure that helps people get work in the industry, and a very large industry. Also, in that case, the assistants are literally there (in theory) to assist one person’s vision working in a technical capacity, and in the case of 48 hour graphic novels, everyone is there working as equal creators. So this is not a good analogue for what we’re doing. Also, manga assistants deserve every bit of credit they can get.

    Make it easier to track

    So as you finish a page, it’s a really good idea to write up exactly what every creator did on that page so that there is a clear listing that can be put into the final book.

  • What is the bare minimum you need in order to do a 48 hour graphic novel?

    I will go into these topics much more in depth through out this webpage, but I wanted to write up a list of what I believe is necessary at the minimum to make a 48 hour graphic novel work. These projects could be widely varied, but there are a few things that seem to be universal to this sort of project:

    • Time (at least 48 hours)
    • Art and Writing Supplies
    • People
      • Artists
      • Writers
      • Letterers
      • Digital team
      • Print expert if printing
      • Managers
      • Helpers
      • People who know, love, read, and/or create comics*
    • A Place to work together (either physical or digital)
    • Food and Drinks

    *This is not to say that everyone involved should be comic experienced – this is to say that some of the people involved should have experience with comics. Comic creation and structure is a whole world unto itself, and it’s important to have at least a few folks who are intimately familiar with the format.

  • Writer’s tips: Plot

    NOTE: It’s a good idea to read the starting points post before this one.

    People spend decades writing books and screenplays sometimes. This project is just a couple of days. So there’s a real need to figure out the plot and how everything will work together quickly. There are a lot of options available.

    Simple plot explanation

    A plot will need to have a beginning, middle, and an end. During the first GNW, I created a example in comic form:

    The basic ideal being that in the beginning we figure out who the character is, and how they get into a problem. Then we have them face difficulty of some sort. Finally, we find a way for them to triumph (or in the case of tragedies, fail).

    This may seem incredible straightforward, but it’s essential to determine the beginning, middle, and end, so that everyone knows what they are working towards. This doesn’t need to be done at the beginning, it could be figured out on the way, but readers expect this structure.

    “Save the Cat”

    Blake Snyder’s book, “Save the Cat” is a classic review of structure in Hollywood screenplays. It gives a quantitative structure of what needs to happen and where – minute by minute – in a film. It’s hard to use this as a one-to-one resource in a 48 hour graphic novel, as you will not know at the beginning how many pages you have to tell the story, but so far as giving a clear outline where you just need to slot in moments, it might be a good resource to review.

    There are also a number of resources online to map out “standard” structures for various genres (mystery, romance, thriller, etc.)

    Some people feel that following this sort of pre-fabricated structure makes films and books a bit too formulaic, and that might be true (I absolutely believe it’s true, but what do I know?). All the same, this will make the story familiar, and act as a guide for you in this process, and you might find that useful given the short timeframe available.

    Story board

    It might be useful for the writers to layout the story on a story board, either visually (possibly using the thumbnail drawings recommended) or with text post-it notes. This gives the ability to move concepts around, and see how everything fits.

    This is also helpful to the artists – one of the biggest things we heard from artists in the first graphic novel weekend was that they wanted to know where they fit into the story. So having a large story outline where they can picture a little drawing of themselves and the words “you are here” will be very appreciated.

    Let your freak flag fly!

    The artists are likely to want to draw weird things. Few artists come to a comic book related project expecting to draw two people sitting at a table hashing out an argument. So, even if the writing team finds a story they want to tell that’s relatively straightforward and grounded, it would be a good idea to find a way to make sure that the artists can draw some more bizarre things. Structuring the plot around dream sequences, museums, film shoots, etc. can add that sort of spice into an otherwise straight ahead story.

  • General Guidance Art

    Any advice given here is just that, advice. You will need to find your way to navigate this process.

    Be yourself

    You are yourself. You have an artistic method and outlook that is yours. You can play around with all of the tools provided at the event, and learn new techniques, but be yourself. Bring what you have to the table. Everyone is different, and there is no better or worse in this event, only different. So bring your uniqueness to this project, and find a way to make it work with everyone around you.

    And don’t worry if you feel like your art won’t fit in with what other people are doing. Everyone naturally plays off of each other a bit, and interestingly when everything is in black and white, we found it all naturally looks like it fits together. This is especially true if you’re using the tools provided.

    SPEED, SPEED, SPEED
    The name of the game is speed. 24 hour comic day (which is our inspiration) participants finish pages in 1 hour on average. Each page in this project might take longer, but if you can do something to make the pages go faster while still telling the story, do!

    You have the hardest and most fun job in this event. The key is to make things easier for yourself:

    • Keep things simple unless they are important to the story.
    • Focus on characters.
    • Use the minimal necessary detail to the backgrounds. 
    • Work together with other artists, and find a process that builds on your strengths.

    The key is to pick your battles – spend extra time when you’re working on important panels.